Formerly Matsushita Electric Industrial Co., Ltd, Panasonic was founded in Japan in 1918 and went on to become Japan's largest electronics producer. Panasonic TV has a very good performance, if you just got a new Panasonic TV, how to make full use of it? Have some DVD movie collection and wish to store them on an external USB drive so that you can play the DVD movies on Panasonic TV directly through the USB port? In this article, I will share you a simple way to play DVD movies on Panasonic TV via USB Drive.
How to copy DVD movies to the USB Drive?
Before you copy DVD movies to the USB Drive for playback on Panasonic Smart TV, there are three points you need to make clear.
Firstly, there are many types of copy protection that are used on commercial DVD discs, which prevents you from making backup copies of your DVDs. The good news is that there are many software on the market allow you to either circumvent or completely strip DVD copy protection so that you can get full control over DVD that you have legally purchased.
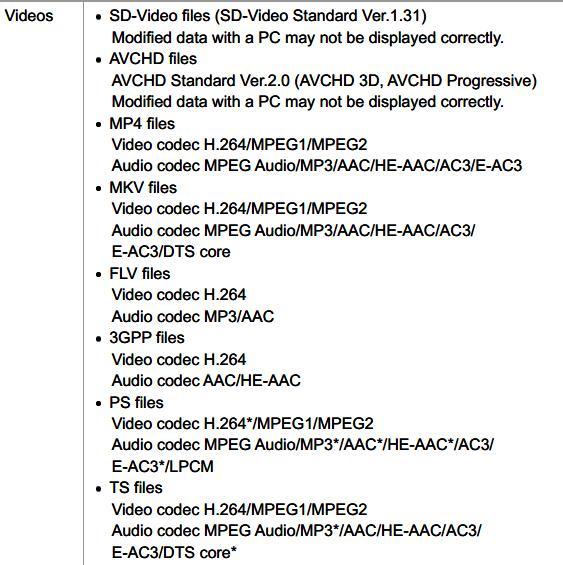
Secondly, before going any further, you shoule be clear of what file formats can be played on Panasonic TV. To get that information, you can consult the user manual or promotional material for the particular Panasonic TV set to what file types can be recognized by the TV model. In most cases, you can play H.264 MP4 on Panasonic TV via USB port, or other video formats listed below:
In addition, only a proper file format will not ensure you a successful playback, you still need to form your USB drive to a format that's compatible with your Panasonic TV. You can check the user manual to find the information or do some search on Goole, you will finally get the answer and find that your USB drive needs to be formatted to FAT32. In addition, for different format USB drive, there will be a maximum file size limitation, for FAT32 usb drive, the maximum file size limitation is 4GB.
If the video is larger than 4GB, you can reduce its file size in the following different ways:
# Reduce DVD movie file size with no quality loss
>> Trim or cut video files to remove unwanted parts or segments
>> Split large video into small parts by file size, count or length
# Compress DVD movie files with some quality loss
>> Lower output video resolution
>> Lower output video bit rate 20-50% of the default
>> Lowering the frame rate of your video to 15 or 10 fps can reduce the file size by as much as 1/2 or 2/3
Best Tool to Copy DVD to USB Drive for Playback on Panasonic TV
To finish these tasks, you need help from a professional DVD ripping tool (Review: Best DVD Ripper in the Market). Here Pavtube DVDAidshould be taken into your consideration. With it, you can remove all of the copy protections from your DVD discs and rip DVD discs to Panasonic TV compatible H.264 MP4 effortlessly. For novice, Pavtube offers optimized preset for Panasonic TV, you can rip DVD to Panasonic TV in a simple click and no need to worry about the format compatibility.
Meanwhile, you can also convert DVD discs to AVI, WMV, FLV, MOV, MKV or other format so that you can watch them on any of your portable devices or media players. With a built-in video editor, you are able to change the DVD movies according to your needs with a simple click. If you're using a Mac, please turn to Pavtube DVDAid for Mac, which allows you to convert DVD on Mac (macOS High Sierra included). Take a look at its amazing features and download it in your Windows PC or Mac for a free trail right now!
How to Rip DVD for Panasonic TV Playing from USB Drive?
Step 1. Load DVD movies
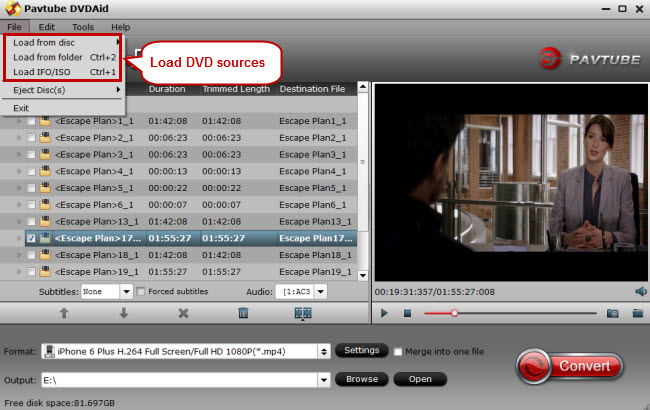
Install and lunch the DVD converter, click the "load disc" button to load your DVD movies to this program.
DVD Folder, DVD IFO File, DVD ISO Image File are supported as well. By clicking the dropdown list of “Subtitles” & "Audio", you can select your preferred subtitles while viewing your DVD movie.
Step 2: Output Panasonic TV preset playable formats
From "Format" drop-down list, directly output Panasonic TV preset profile formats "Panasonic TV(*.mp4)" from "TVs" category.
You can also select H.264 MP4 from "Common Video" or "HD Video" category, which is compatible for Panasonic Smart TV as well.
Step 3. Advanced settings (optional)
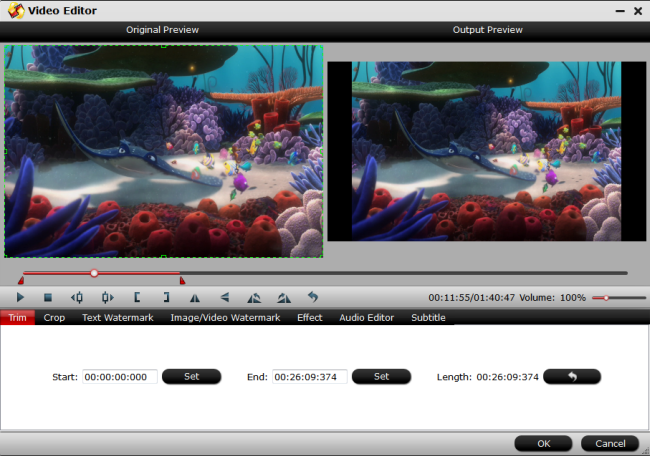
Before start the DVD conversion, you can click the 'Settings" icon and adjust the video bitrate, codec, frame rate, audio sample rate, etc parameters. You can also click "Edit" to reduce DVD movie file size with no quality loss by trimming or cutting video files to remove unwanted parts or segments, or splitting large video into small parts by file size, count or length.
Step 4: Start the conversion
After the above steps, go back to the main interface and click the "Convert" button to begin converting DVD movies to Panasonic TV highly compatible MP4 video files. When the conversion is done, click "Open" to locate the ripped videos.
Then you can transfer the converted DVD movies to USB and connected to Panasonic TV for playing. Or you can transfer them to your PC, NAS devices, Plex media server or other DLNA enabled devices and tell the Panasonic TV to play it with MX Player, Plex, VLC Media Player,etc.

 Home
Home


 Free Trial DVDAid


