The forthcoming PS4 System Software Update 4.50 will bring improved tracking and 3D Blu-ray playback to Sony’s PlayStation VR headset. Then you can watch 3D Blu-Ray movies through the PSVR headset with no additional settings or features. You just put the disc in, put the headset on, and the 3D effects start immediately.
To successfully play 3D Blu-ray on PS VR, you have something to be prepared. You can see the details below.
Before you get started to play 3D Blu-ray on PS VR
1. The first thing you need in order to watch a 3D Blu-Ray in your PlayStation VR is an actual 3D Blu-Ray. Below are some new released 3D Blu-rays.
xXx: Return of Xander Cage 3D Blu-ray
Passengers 3D Blu-ray
Fantastic Beasts and Where to Find Them 3D Blu-ray
Assassin's Creed 3D Blu-ray
Rogue One: A Star Wars Story 3D Blu-ray
2. The second thing you need to notice: Watching 3D Blu-Rays with the PlayStation VR only works if you have the latest updates to both the system and the headset. You want the PlayStation 4 to be updated to System Version 4.5, and the PlayStation VR to be updated to System Version 2.5.
3. Next point is the headset positioning. It's usually pretty important to make sure your PSVR is correctly positioned on your head, but when watching a 3D Blu-Ray this is critical. If the image is shifted too far in any direction because the lenses are not correctly positioned in fron of your eyes, the 3D effect can quickly become disorienting. Make sure you're seated, and your headset is correctly aligned.
4. It's also important to make sure the lenses in your headset are as clean as they can possibly be. Make sure you have a microfiber cloth nearby, and remove any smudges from the lenses before you try to watch a 3D Blu-Ray.
How to Watch a 3D Blu-Ray through PlayStation VR?
When you make sure you have prepared the above 4 things, you can view 3D Blu-ray on PS VR. Insert 3D Blu-ray disc to PlayStation 4. Once the 3D disc is inserted, Cinematic mode will adjust to show you the movie in 3D.
The display size will remain whatever your default setting is. But you can adjust it. If you've set your Cinematic Mode to Medium, you'll probably want to increase the size to Large when watching 3D Blu-Rays. This will use more of the display, and offer you more of the 3D experience.
After the display size was set to your liking, it's important to position the display just slightly higher than you'd normally set it when playing a game. This makes it easier for you to shift a little during the movie, so you aren't trying to reset the view while watching.
Now, you can start the 3D Blu-ray movie. Once the movie has started, you'll be able to control the movie just like you would any other movie viewed through your PlayStation 4.
Converting 3D Blu-ray to 3D MP4 for PS VR Playback
Before the update, how can we play 3D Blu-ray through PS VR? From the Web, PS4's Media Player rolls out support for 360-degree videos in MKV, AVI, MP4, MPEG2 PS, MPEG2 TS, and AVCHD formats. So, we can convert 3D Blu-ray to 3D MKV/MP4 for PS VR Playback.
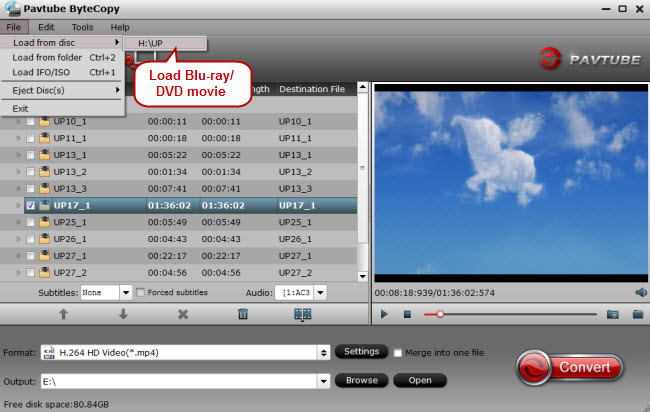
You can use Pavtube ByteCopy to convert 3D Blu-ray to 3D SBS video for PS VR. Pavtube ByteCopy can convert 3D Blu-ray to 3D MKV, 3D MP4, 3D AVI for PlayStation VR playback. You can adjust 3D depth to make the video more immersive and keep the Blu-ray 1080p high resolution. You also can rip 3D ISO and DVD to 3D MP4/MKV video for PS VR.
Step 1. Load this 3D Blu-ray Ripper. Open this 3D Blu-ray Ripper for PSVR. You can directly use the “Load from Disc” button to load the 3D Blu-ray disc that you wish to convert into PSVR format.

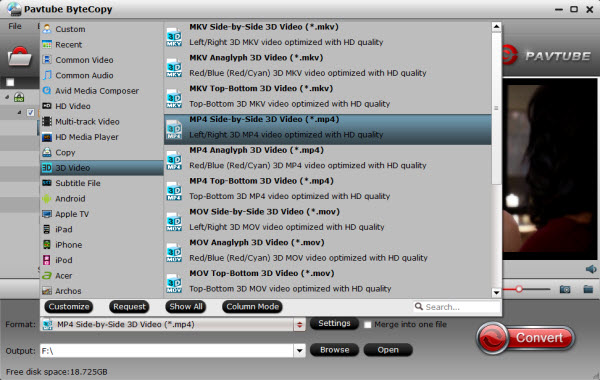
Step 2. Click "Format" and select "MP4 Side-by-Side 3D Video (*.mp4)" from "3D Video" category as the output format. It works on PS VR perfectly. The output 3D video also can be Daydream View, HTC Vive, Samsng Gear VR, Homido VR, Oculus Rift DK2/CV1, Samsung 3D TV, LG 3D TV, etc.

PS VR uses a single 5.7" 1920 x 1080 resolution full-color OLED RGB display, also known as “1920 x RGB x 1080.” Unlike other VR displays, the PS VR display uses full Red, Green and Blue sub-pixels to produce a full color pixel. There are 1920 Red, Green and Blue sub pixels for each of the 1080 lines of pixels, so this is referred to as 1920 x RGB x 1080. Before starting the conversion, click the “Setting” icon on bottom right corner where you are able to adjust the video/audio settings like encoder, resolution, frame rate, bit rate to make the output video more vivid.
Step 3: Click on “Convert” button to accomplish the process of 3D Blu-ray to PSVR conversion. And this virtual reality video conversion will be finished in a short time. After the conversion, click the “Open” button to locate converted files, and then you can import the output .mp4 files into PlayStation VR for playing with the best quality.
Quick PS4 and PS VR Setup Guide
Turn off your TV and PS4.
Slide back the cover on the Processor Unit.
Connect the HDMI cable from the HDMI PS4 port on the Processor Unit to the back of your PS4.
Connect your original PS4 HDMI (or any HDMI cable) cable from the TV to the HDMI TV port on the Processor Unit.
Connect the included USB cable with the small end going into the Processor Unit and the large end connecting to one of the PS4 console USB ports.
Connect the included VR Headset Connection Cable into the Processor Unit and VR Headset, using the symbols to align the cable properly.
Connect the PlayStation Camera to the AUX port on the PS4 and place it on top or directly above the TV.
Power on the TV, then the PlayStation 4, and finally the PSVR via the Inline Remote.
Plug in the PlayStation Move controller and pair it to the PS4 if need be, then download the PSVR update when prompted.

 Home
Home Free Trial ByteCopy


