The Pixel C is Google's first own-brand tablet, designed and made via China by Google and is the best Android tablet available at the moment. It comes with a 10.20-inch dispaly with a resolution of 1800*2560 pixels and a density of 308ppi, so you can get a fantastic visual experience in this screen. However, just as other common portable tablets, the Google Pixel C tablet doesn't have the DVD drive for playing DVD movies. That means, it is still hard for filmniks who are enthusiastic about collecting DVD discs, to watch DVD on Google Pixel C.
In fact, the only way to watch DVD movies on Google Pixel C is to rip DVD to Google Pixel C playable video formats with a DVD ripper software and then transfer the generated video files to Google Pixel C for playback. In this article, two free ways of how to rip DVD to Google Pixel C supported video files are listed and the last part will focus on introducing how to transfer the generated videos to Google Pixel C.
Before we start ripping DVD with a free third-party software, we need to know what media formats Google Pixel C supports. According to its official introduce, the Google Pixel C supported file formats are listed below:
Video formats: MP4, WMV, FLV, 3GP
Audio formats: MP3, AAC, WMA, AMR
Among these video formats mentioned above, MP4 is one of the best supported formats due to its small size, high quality and its compatiblity with almost all Android tablets and smartphones. Next, let's start the DVD to Google Pixel C conversion process with free tools.
Part 1: How to free rip DVD to Google Pixel C with Pavtube Free DVDAid and Handbrake?
Part 2: How to free convert DVD to Google Pixel C via Pavtube DVDAid?
Part 3: How to transfer generated DVD movies to Google Pixel C?
Part 1: How to free rip DVD to Google Pixel C with Pavtube Free DVDAid and Handbrake?
To successfully rip DVD to Google Pixel C supported MP4 video format, you need a professional DVD ripper to remove the copy protection from DVD discs first. Here the Pavtube Free DVDAid (Windows / Mac) is a free DVD ripper that will never let you down. It can decrypt DVDs and remove DVD copy protection without needing to install other decryption software. Futhermore, with the built-in video editor, Free DVDAid has the ability of edit video by trimming, cropping, splitting, merging, adding subtitle file, etc. It can rip DVD to AVI, MKV, MOV, M4A, AAC, etc. around 70 video and audio formats.
The only drawback of this free tool is that it doesn't support ripping DVD to MP4. If you need MP4 video format, you need to upgrade the free version, which may cost you $28. But I suggest you to combine Free DVDAid with another free tool: Handbrake, which can convert various videos to MP4, but can't rip copy-protected DVDs. Just read the next guide to free rip DVD to Google Pixel C with Pavtube Free DVDAid and Handbrake.
Step 1: Load DVD to Pavtube Free DVDAid
Insert DVD into DVD-Rom, launch the Free DVDAid, and load DVD by clicking on the "Load Disc" button. You can also import DVD VIDEO_TS folder, ISO files, and IFO files into this freeware.
Step 2: Rip DVD to Common Video Files with Pavtube Free DVDAid
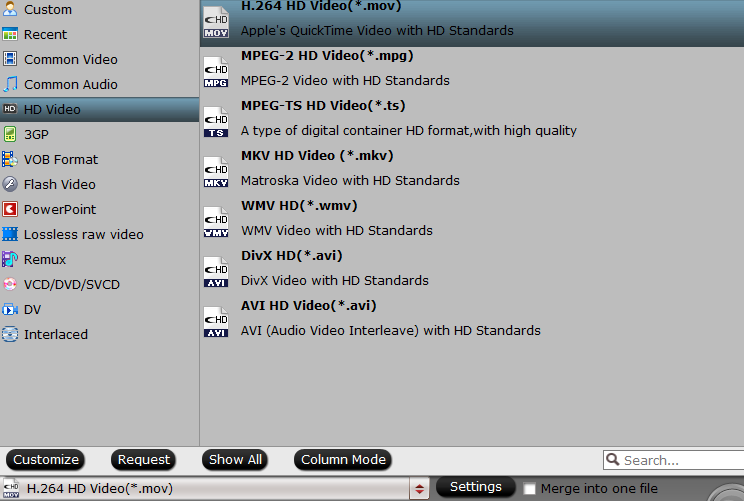
Click Format bar to open output format list, just choose a common video format from "Common Video" or "HD Video" category. Then click "Convert" button on the UI to start ripping DVD to common video files.
Before start ripping process, you can also customize DVD movie by selecting the desired audio stream and subtitle track, clicking "Settings" icon behind format bar to adjust profile parameters, pressing on "Edit" icon to edit DVD movie with wide range of options.
Step 3: Convert generated video files to MP4 with Handbrake
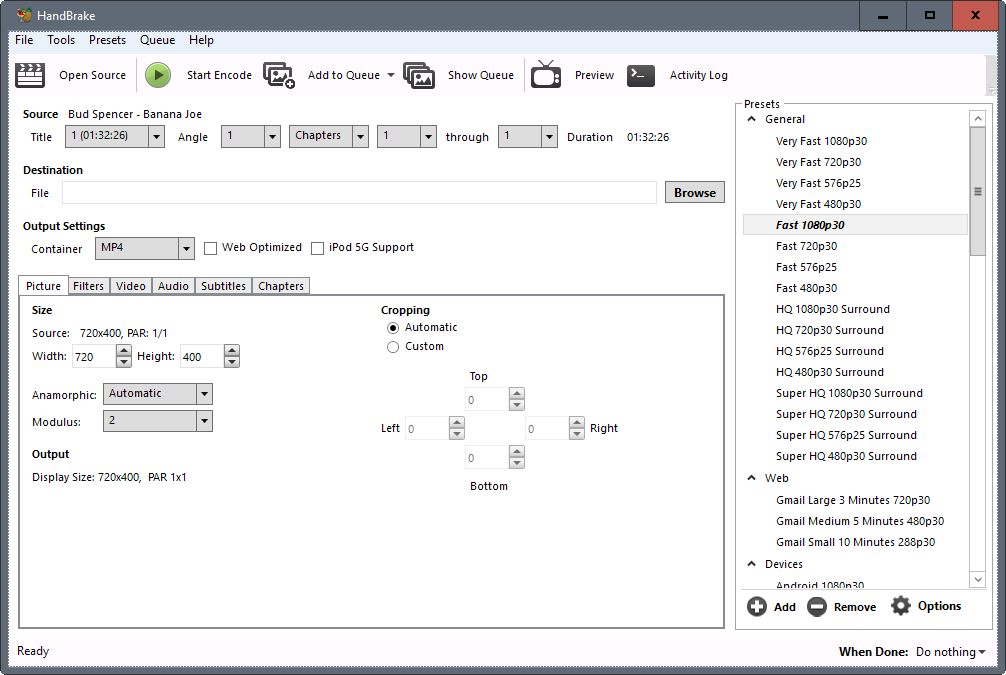
After extracting a video file from DVD disc with Pavtube Free DVDAid, you can close Free DVDAid and launch Handbrake on your computer. Follow the next steps to get MP4 video file for Google Pixel C with Handbrake.
1. Click the Source button on the top-left corner to import video content.
2. Click Browse button under Destination to set the directory for the converted file.
3. Click "Container" to choose "MP4" as output format.
4. To start converting video to Google Pixel C, click the Start button.
Then the DVD to Google Pixel C conversion should be done with the help of Pavtube Free DVDAid and Handbrake. You may feel that the first free way is a little complicated. If you don't want to download two softwares, you can try the second free way.
Part 2: How to free convert DVD to Google Pixel C via Pavtube DVDAid?
We find another free DVD ripper from Pavtube can directly ripping DVD to Google Pixel C supported MP4 video format, that is Pavtube DVDAid ( Windows/ Mac). This powerful software can generate more video formats than Pavtube Free DVDAid and Handbrake, including H.265/HEVC, M3U8, MKV, MP4, AVI, WMV, MOV, etc. Then you can quickly copy the converted DVD movies from computer to Google Pixel C for playing without limitations.
Now, just go to the second free way to convert DVD to Google Pixel C:
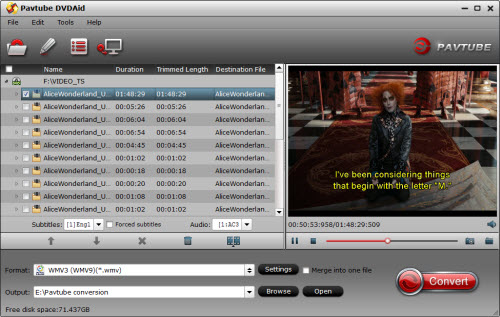
Step 1: Load DVD to Pavtube DVDAid
Launch the program on your computer, click the "Load files" button to import DVD disc from the optical DVD drive to the program.
Step 2: Pick output file format for Google Pixel C
From the "Format" drop-down list, select Google Pixel C supported video format from "Common Video" > "H.264 High Profile Video (*.mp4)" as the output video format.
Tips: Edit DVD movies (Optional)
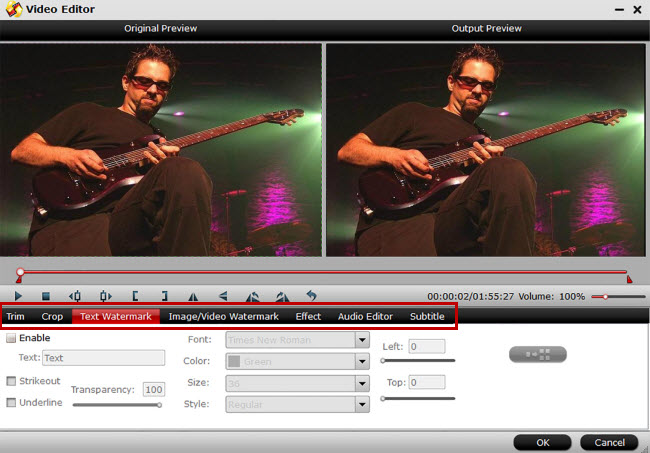
With the built-in video editor, you can get the several wonderful clips from DVD by trimming, cut off black edges or unwanted areas to ensure better visual enjoyment, write remarks by adding watermarks, etc.
Step 3: Start rip DVD to Google Pixel C playable video format
Click the "Convert" button to start DVD to Google Pixel C conversion process. When the conversion is completed, you will have no problem to transfer and play your favorite DVD movies on Google Pixel C.
Part 3: How to transfer generated DVD movies to Google Pixel C?
No matter which free way you choose, you can finally convert DVD to Google Pixel C playable video files, then just follow the methods listed in this part to transfer the generated DVD movies to Google Pixel C for enjoying.
1. Bluetooth
Enable Bluetooth in both your Windows PC and Google Pixel C and pair it. After pairing you can send the files by right clicking and selecting send to Bluetooth option in the Windows PC. For Small files, the Bluetooth feature will be much useful and can avoid any further configuration or setup time. For larger files, bluetooth transfer may take considerable amount of time.
2. Google Drive/ Dropbox / OneDrive etc
This method can be used when you have Internet access. Just Copy or Move your file into Google Drive / Dropbox / OneDrive folder installed in your PC and that's all. You can access the same file in your Google Pixel C after automatic syncing.
3. Direct transfer via USB
This method is simple and usable for most of the files but it requires you to take the USB cable supplied with the Google Pixel C always.
For Windows users:
1. Connect the Pixel C to your computer using the included micro-USB cable.
2. Swipe down the status bar, then select "Connected as an installer".
3. Select "Media device (MTP)".
4. Open "Windows File Explorer".
5. Under "This PC" your Google Pixel C will be listed. Open it.
6. Find the "Movies" folder.
7. Drag and drop the converted DVD video files over to the "Movies" folder on the Google Pixel C.
8. Drag-video-file-to-folder-on-removable-disk
Note: Windows Media Player users can select the "Sync" tab and drag video over to the sync list. Selecting "Start sync" will automatically copy video in the list to the device.
For mac users:
1. Download Android File Transfer.
2. Once downloaded, open the "androidfiletransfer.dmg" file.
3. Drag "Android File Transfer" to the "Applications" folder.
4. Connect your Google Pixel C to your Mac using the included USB cable.
5. Open the "Android File Transfer" application.
6. The application will show the items on your device. Open the "Movies" folder.
7. Drag and drop converted DVD vidoe files over to "Movies" folder on the Google Pixel C.
Once your DVD movie files have transferred to the Google Pixel C, be sure to properly eject the device from your computer properly.

 Home
Home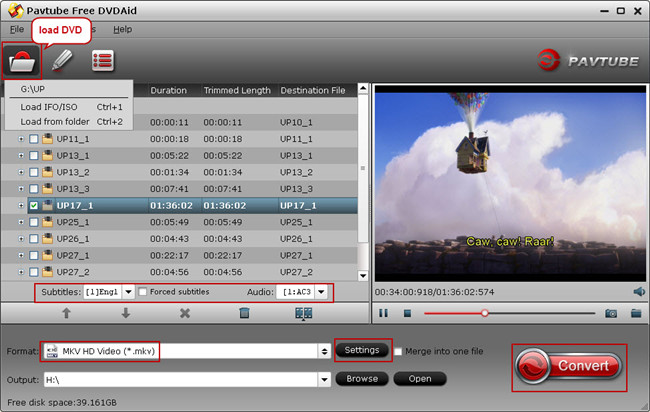

 Free Trial DVDAid


