If you are insterested in editing Blu-ray videos and want to bring the distinctive auditory enjoyment on MAC for your fiends, No doubt, the multiple track AVI is the best choice. you can keep the multiple track and bring people different feeling. If you are the fan of Hollywood science fiction movies, you get a Blu-ray and want to get the amazing video enjoyment when you are watching the movie on MAC. You need a suitable software to rip Blu-ray to multiple track AVI. Also users can rip Blu-ray to multiple track AVI and while watching, control all of the audio tracks individually with a software. It is very useful for learning foreign languages.
Above all problems can be solved by a powerful software which can rip Blu-ray to multiple track AVI. So how to find it? There is few softwares like this on market. Based on the powerful function, user friendly or the ripping time and as a person who started ripping Blu-ray to multi-track AVI, I have gone through a lot of ripping programs on Pavtube ByteCopy for Mac, then following will show you the steps on ripping Blu-ray to multiple track AVI for playing on Mac. You can click here to know more about Pavtube ByteCopy.
If you still can't know more about this software after the following easy steps. No problem, here will summarize some points for your reference.
Point 1: Pavtube Bytecopy can support different system versions, such as macOS High Sierra, macOS Sierra, Windows 10, etc . You don't worry the compatibility problem any more.
Point 2: Pavtube Bytecopy interface is very friendly and operable, just few buttons you can do whatever you want on your Blu-ray, such as:"Format" button,"Browse" button,"Setting" button,"Convert" button, you can master this software within a cup of coffee.
Point 3: Not only Blu-ray,DVD is also supported by Pavtube Bytecopy. you can also to rip Blu-ray or DVD to other loessless multi-track formats, like multi-track MP4, multi-track MKV, multi-track MOV etc.
Point 4: As well as video tracks in a AVI container file, Pavtube Bytecopy enables users to select wanted subs, audio, video track to be preserved in the output files.
Steps on Ripping Blu-ray to multi-track AVI on Mac
Step 1. Load Blu-ray
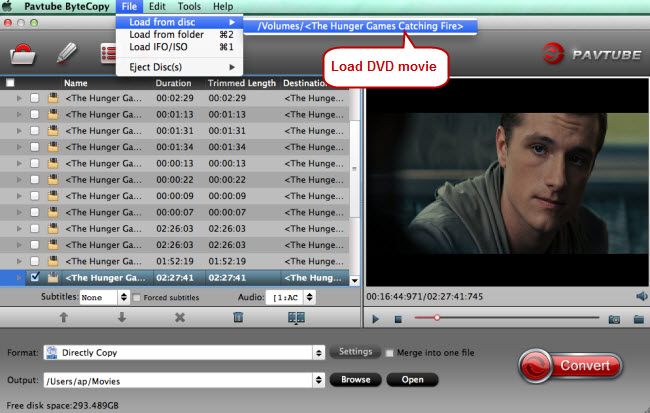
After you install Pavtube ByteCopy successfully, then you insert your Blu-ray to your computer and open the software, Pavtube ByteCopy can detect the Blu-ray main title automatically, you just need to choose main title.
Tips: You can also choose other titles based on your need. Also you can edit your video with Pavtube ByteCopy.

Step 2. Choose Multi-track AVI Format
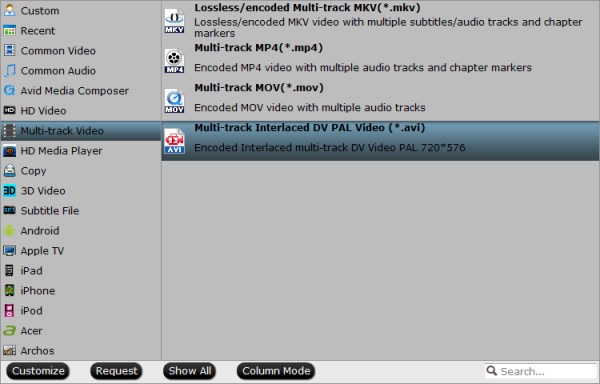
Click the"Format" and in the drop-down list to choose"Multi-track Video" then choose"Multi-track Interlaced DV PAL Video (*.avi)"

Step 3. Start to Rip Blu-ray to Multi-track AVI
You just click the right"Convert" and wait for a while, a perfect Multi-track AVI movie will be done.You can click"Open Putput Folder" to find the output video.
Tips: Click the"Setting" button, you can set the video or audio some paremeters by yourself, such as: Codec/Size(pix)/Bitrate(kbps)/Frame Rate(fps).
The steps to rip Blu-ray to Multi-track AVI for playing on MAC is very easy to master, I believe you will love it like me. For more information about multi-track AVI players, you can refer to here.
No1: DivX Plus Player
It can support multiple subtitles and audio tracks with smooth fast-forward and rewind.
No2: iMixPlayer HD
It can change the volume of audio tracks separately and simultaneously (multitrack files such as AVI, MKV , MKA , MP4).
Useful Tips
- Alternatives to WinxDVD for Mac
- Backup DVD to QNAP TS-231P NAS on macOS High Sierra
- Best Blu-ray Ripper for macOS High sierra
- How to Get Blu-ray Playback on macOS High Sierra iMac/MacBook (Air/Pro)/Mac Mini/Mac Pro/iMac Pro?
- How to Copy Blu-ray on macOS High Sierra?
- Best Solution to Copy DVD to Hard Drive in lossless MKV on macOS High Sierra

 Home
Home Free Trial ByteCopy for Mac


