People often add some flim clips or snapshots in their videos to make their videos more attractive when they edit the footage in Premiere Pro (CC, CS6, CS5, CS4) before post to YouTube. When the movie you want to use on the local, it is easy to trim a fragment and merge it into the YouTube video on Premiere Pro. But how will you do when the film is a DVD video? All of the versions of Premiere Pro don't support DVD.
Is there any way to trim a DVD clip and add DVD clips to Premiere Pro (CC, CS6, CS5, CS4) for editing? When searched the solution on Google, you can get three solutions. But you can't get 100% work on the former two methods.
Method 1: Copy DVD to VOB for Premiere Pro CS4, CS5, CS6, CC
VOB file support was added in CS4 with the 4.1 update, however non-standard VOB files remain problematic. If you want to try to save DVD to VOB on Windows or Mac for Premiere Pro, you can download Pavtube BDMagic for Windows and Pavtube BDMagic for Mac to directly copy DVD to VOB on Windows and Mac for Premiere Pro CS4, CS5, CS6, CC.
Below is the step-by-step instruction to copy DVD to VOB for Premiere Pro with DVD Copy tool.
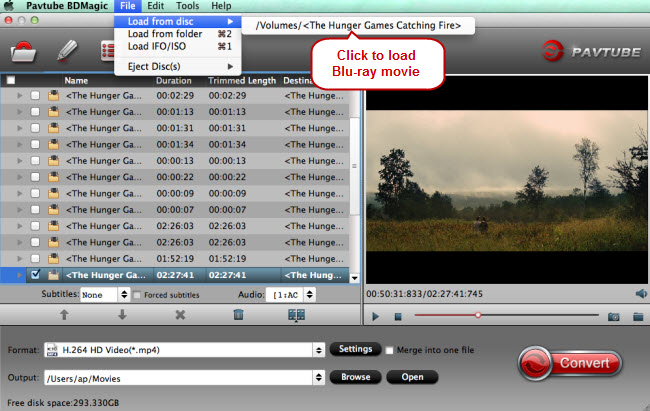
1. After successful installation, click the “Load from disc”, browse to disc drive and import DVD into this DVD Copy tool.
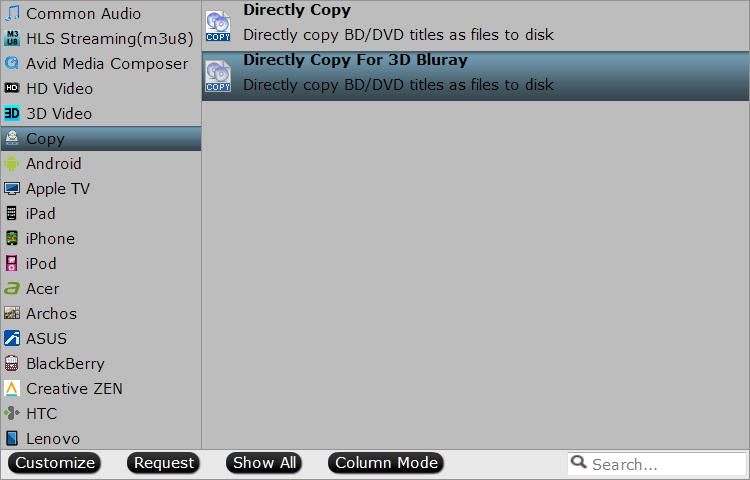
2. Click the format bar to follow “Copy” and “Directly copy”. Directly copy allows you to copy the main title VOB files from your DVD discs without extras. Please note that Pavtube trial version only supports 6-time directly copy.

3. Click the “Convert” button on software main interface and DVD to VOB conversion begins. After it is done, you can find the VOB files in output folder.
Now, try to import VOB files to Premiere Pro CS4, CS5, CS6, CC for editing.
Method 2: Rename VOB files to MPG for Premiere Pro CS4, CS5, CS6, CC
There are some people saying they get success in renaming the VOB files to MPG and then editing them in Premiere Pro. But this way is likely problematic. You perhaps experience no audio issues in Premiere Pro when importing MPG files from VOB files. In CS4 and later, you can try to demux the MPEG file and import the separate video and audio files into Premiere Pro. Or you can make it easy on yourself and directly convert the DVD video to to an editable format like DV AVI, MPEG-2, MP4, it just works in Premiere Pro CS4, CS5, CS6, CC.
Method 3: Convert DVD to DV AVI, MPEG-2, ProRes for Premiere Pro (CC, CS6, CS5, CS4)
This way make you easily edit DVD videos with Premiere Pro (CC, CS6, CS5, CS4). You just need to rip the files to your hard drive and then convert them to Premiere Pro supported format before editing them. We still use Pavtube BDMagic for Mac and Windows. Or you can use some other DVD Ripping tools.
Pavtube BDMagic can directly remove DVD copy protection and shift DVD VOB format to another one such as DV AVI, MPEG-2, H.264, H.265, MP4, ProRes for Premiere Pro editing. 100% clear installation. Easy to use. Fast speed.
Complete instructions:
1. After the installation, launch the application on your computer, click "File" > "Load from disc" to Load DVD from optical drive. Besides DVD, you also can import Blu-ray, ISO to convert to Premiere Pro. Below snapshot is a Mac version software. Under the preview window, there is a button like a camera. Click it, you can capture picture of your DVD video.

2. Click “Format” pull down list to select Adobe Premiere/Sony Vegas> MPEG-2(*.mpg) as the best video format for Premiere Pro. WMV, MOV, MP4 formats are the good choice as well. You also can choose DV NTSC AVI video, or DV PAL AVI video in "DV" category. If you are using a high-end computer and high version Premiere Pro, you also can choose ProRes format. You can click Settings to adjust video and audio parameters to get the best quality video for Premiere Pro.

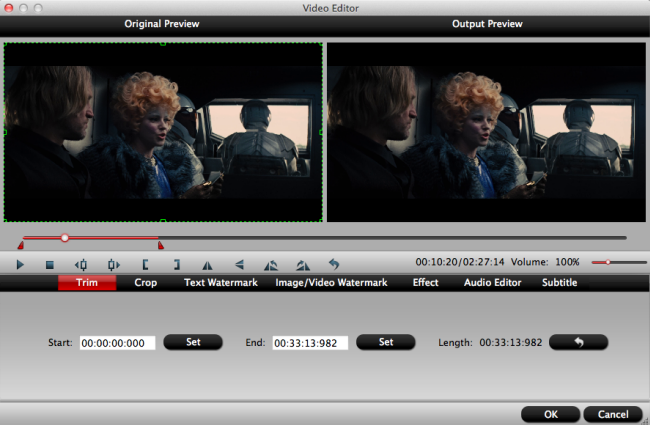
3. (Optional) A DVD video is usually around 120 mins. When you don't need the whole movie, you can click "Edit" button on the top menu to start to edit DVD videos. You can trim DVD movies to remove the unwanted parts by setting the start and end time, crop to remove the black borders or unwanted area by dragging the dash line around the video frame, remove audio from DVD video, etc. You can read the specified steps here: Edit Video in BDMagic

4. Click the "Convert" button to start commercial DVD to Premiere Pro (CC, CS6, CS5, CS4) supported editing video and codec conversion process. When the conversion is completed, you will have no problem to import video to Premiere Pro for creation.
Choose any way you want to make your video more funny by adding DVD film in Premiere Pro (CC, CS6, CS5, CS4)!
Useful Tips
- Free Rip DVD with Forced Subtitles on Mac (macOS High Sierra included)
- Rip DVD to Import to Davinci Resolve for Editing
- Rip and Import DVD to Premiere Elements(15, 14, 13, 12, 11, 10) Easily
- Convert DVD to Premiere Pro (CC, CS6, CS5, CS4) Editable Video
- Review: Mac Blu-ray Ripping for iOS, Android Tablets & Phones
- Rip/Copy Blu-ray (ISO) to Galaxy Note 2 on Mac

 Home
Home Free Trial BDMagic for Mac


