There’s plenty to endear the palm-sized AAXA P2 pocket projector. It is quite handy (260g only), and brightness climbs to 33 lumens while the resolution gets a boost to 800 x 600; even better, there’s a standard VGA input along with the usual onboard media player, 1GB of integrated storage and microSD card slot. Although the 1,700mAh rechargeable battery is only good for 35 minutes use, an optional external battery can supply 70 or 180 minute capacities. It is very cool to have such a handy pico projector project your stunning movie collections at a size of 80”. But not all the file formats are supported by the small LED pico projector and you get to make sure the AAXA P2 pico projector support the video formats you’ll play. Let’s take a brief view of accepted file formats by the media player of AAXA P2 pico projector:
Video formats supported: MP4, AVI, WMV, and SMV
Audio formats supported: MP3, OOG, and WAV
Other formats supported: BMP, JPG, GIF, and TXT
To project videos of other formats and play DVDs, blu-rays with AAXA P2 pico projector, Pavtube Video/DVD/blu-ray to AXA P2 Converter for Mac is helpful. This Pavtube AAXA P2 Converter Ultimate for Mac enable users to create optimized videos for AAXA P2 from blu-ray movies, DVDs, HD videos, TV recordings, and more on Mac. A free trial version of AAXA P2 Converter Ultimate for Mac is available and a step-by-step guide of ripping blu-ray disc/DVD and converting videos to AAXA P2 on Mac is for your reference:
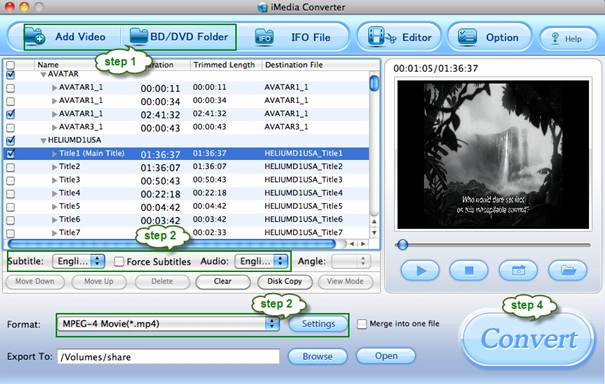
Step 1. Load blu-ray/DVD/Video to AAXA P2 Converter for Mac.
Run the AAXA P2 Converter Ultimate, click “BD/DVD Folder” to load your DVD or Blu-ray disc, and click “Add Video” to load your video files like MTS/M2TS, MKV, MOV, TOD, TiVo, etc. It may take a few seconds to load your Blu-Ray movie from target BD drive. To combine several items (video, DVD and blu-ray movie) into a single file, you need tick off the checkbox of “Merge into one file”. (Note that a BD drive is necessary for ripping blu-ray disc)

The DVD movie is displayed in a directory. Click the triangle arrow to expand the directory for checking movie chapters. Basically the main movie is included in the first Title, so you can check the main title (usually the one with longest duration) only and leave other chapters unchecked. You may also view movie chapters and videos in preview window.
Step 2. Set audio track and subtitles for selected chapters.
Now you can decide which chapters to convert, and set subtitles and audio tracks for them. Basically the main movie is included in the title with longest duration, others are commentary, titles, ads, etc. Tick the titles you want to convert, and then choose proper subtitles and audio track for each selected Title. In preview window you can observe the effect. There is a box of “Force Subtitles” too. When you set English as subtitle and check the box of “Force Subtitles”, the subtitle appears only when languages other than English are spoken. For example, in the movie Avatar, I select English subtitle and set Force Subtitles, the subtitle appears only when the Navi language is spoken.

Step 3. Set AAXA P2 friendly output format.
Click on the “Format” bar and there are various output formats for you to choose from. Since AAXA P2 Pico Projector supports videos in the format of MP4, AVI, WMV, so you just need convert Blu-ray, DVD and various videos to one of these formats. Taking MP4 as an example, you may follow “Common Video”> “MPEG-4 Movie (*.mp4)”.

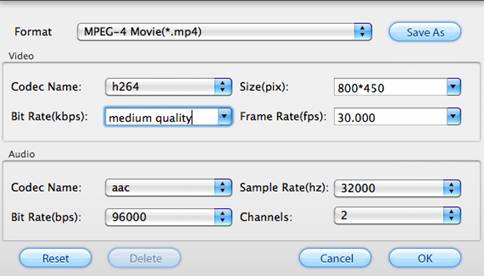
Then you can do some further settings and customize the blu-ray/ DVD movie better fit the AAXA P2 Pico Projector. Simply click on “Settings” button to enter the configuration panel to optimize the format. Common DVD is of 4:3 aspect ratio and blu-ray movie 16:9. In order to avoid stretched image, you’re suggested to set Video Size to 720*480(or 720*540) when converting DVD to AAXA P2 video, and 800*450 when converting blu-ray movie and HD footages to AAXA P2 videos. In that case it will look fine when projecting with AAXA P2 pico projector. If you’d like to create AAXA P2 video of better quality, just set bit rate up.

Step 4. Start converting blu-rays, DVDs and Videos to AAXA P2 optimized video files.
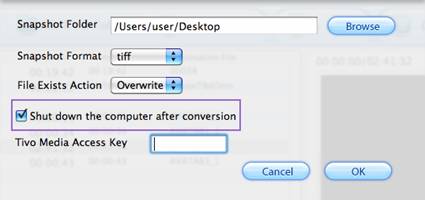
Finally we come to the last step. When back to the main interface, click "Convert" button to start ripping Blu-ray and DVD movie to AAXA P2 Pico Projector, or converting video to customized AAXA P2 videos. Wait till the conversion finished. Usually the Video to AAXA P2 Converter does not let you wait long. But you may check "Shut down computer after conversion" and leave it be when ripping blu-ray movie. Once the conversion task is finished, you can click “Open” button to get the final output files for your AAXA P2 Pico Projector.

Additional accessories allow the P2 to connect to Apple iPhone/iPod, Microsoft Zune, Sony Playstation Portable (PSP), and cellphones from Nokia, LG, Samsung, and HTC. The powerful Pavtube blu-ray/DVD/Video to AAXA P2 converter for Mac also helps Mac users to convert blu-ray disc, DVD and video to iPhone, iPod, PSP, HTC and any other devices that AAXA P2 Pico Projector supports. If you’d like to project ripped blu-ray movies at HD quality with the AAXA P2 Pico Projector, you may convert blu-ray movie to iPhone 4 720p MP4 video and share the 720p HD movie from iPhone 4.
Useful Tips
- How to transfer DVD movies to Optoma PK201 mini projector?
- How to play blu-ray and DVD movies with Samsung SP-H03 Pico Projector?
- How to project blu-ray and DVD movies with AAXA P2 Pico Projector?
- Projecting blu-ray and DVD movies with Optoma PK301/ PK201 Pico Projector
- How to convert blu-ray movies, DVDs and HD videos to Optoma PK301/201 Pico Projector video on Mac OS X?
- Customize blu-ray movies, DVDs for Samsung SP-H03 Pico Projector

 Home
Home Free Trial iMedia Converter for Mac


