Watching Blu-ray movie from HDD is becoming popular (and affordable). Although there is Blu-ray Disc Player, many guys are getting used to rip Blu-ray to HDD to and play BD movies from with HD media players. “This would allow me to have my Blu-Ray and DVD library available all the time without having to go find and insert the disks, and protect my discs from scratching”, I way told by a friend, who has put away his BD and DVD collections and been watching movies with Seagate FreeAgent Theater and a 2TB NAS device. I followed his advice and make a digital copy of Avatar BD movie with Pavtube ByteCopy software. The image turned out to be marvelous on my 47’ HDTV. I must say, this is the best solution for watching BD movies with HD players as I get lossless videos as well as all the subtitles and audio tracks I want. Here’s what I did.
Rip Blu-ray to Lossless MKV for HD Media Player
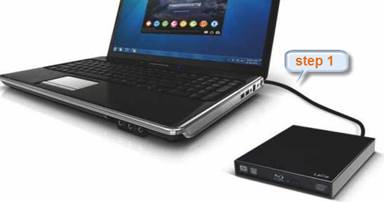
Step 1. Hook up an external BD drive with my desktop (as there is not an internal one), and place Avatar Blu-ray Disc into the BD drive.

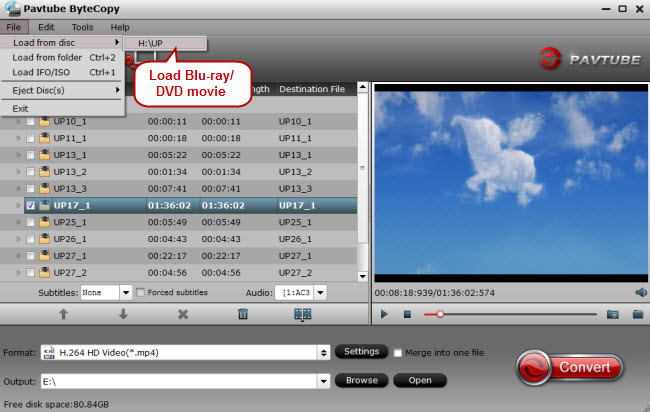
Step 2. Run Pavtube ByteCopy software and click the "File" > “Load from Disc” icon to import movie files from Avatar Blu-ray Disc.

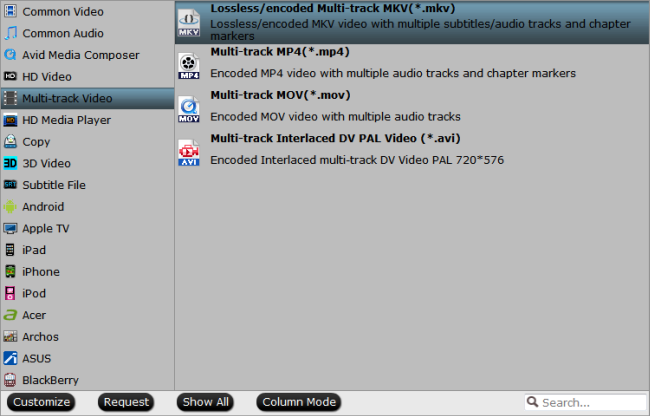
Step 3: In the dropdown list of Format menu, you can find “Lossless/encoded Multi-track MKV (* mkv)” under “Multi-track Video” catalogue. MKV conatainer will save multiple video, audio and subtitle tracks form original Blu-ray in output MKV and you won’t suffer any quality loss.
Note: In default settings, all the tracks are checked for output mkv files. If you wan to uncheck the unnecessary track, click “Settings” on the interface to get it done.

Step 4. Click the “Convert” button to start ripping the Blu-ray movie to MKV file. After conversion I click “Open Output Folder” and get an MKV file of around 40GB.
It takes around 2 hours to rip the Blu-ray movie (which is about 37GB) to my hard drive. It is said the software backs up BD/DVD as fast as the drive can read data. Maybe next time I’d use a faster BD drive. The MKV file plays great on my desktop (19’) using VLC Media player, so I tried to play the Blu-ray movie with WD TV HD Media Player and watch the Avatar on HDTV (47’), and it looks stunning! Here’s a thumbnail.

Top Reasons to Choose Pavtube ByteCopy
Basically I think it’s an ideal solution for watching Blu-ray movies with HD media players and would like to recommend the Pavtube ByteCopy software to HD movie lovers. Why I choose Pavtube ByteCopy:
* Fast speed (comparing with other BD ripping tools)
* Lossless quality (as it simply package BD contents into MKV container instead of transcoding)
* Easy of use (3-step workflow as it shows above)
* Dolby Digital 5.1, ThrueHD 7.1, DTSMA audio, Linear-PCM 5.1 or 7.1 audio keeping.
* Multiple audio tracks and subtitles
* Works with latest Blu-ray Discs (I tried Toy Story 3 and Inception)
* Free of update for lifetime
Software availability FYI:
1. Pavtube ByteCopy Trial version. A trial is free but functional-restricted. Lossless output can be used 3 times only. You may download a trial and see how it works.
2. Pavtube ByteCopy Retail version. A full version is offered at $42 by Pavtube Studio.
Learn >> Rip Blu-ray with MakeMKV | MakeMKV vs Pavtube ByteCopy
Useful Tips
- Convert DVD to 1080p HD Video for HTPC Playing with 5.1 Channels
- Experience 1080p Blu-ray with Netgear NeoTV 550 HD Media Player
- Best solution for playing/watching Blu-ray Disc with HD media players
- Let LaCinema Classic HD play Blu-ray in 1080p MKV format
- How to Watch 2D/3D Videos on HTC Vive?
- How to rip Blu-ray movies for TViX HD N1 Café on Mac?

 Home
Home Free Trial ByteCopy


