This guide is written for Blu-ray movie fans that feel like backing up their Blu-ray collections to hard drive without compression and meanwhile downsize the digital copy as much as possible. Generally, the guide tells you how to:
- Copy a Blu ray Disc to PC hard drive (Windows OS);
- Reduce the size by keeping the main movie only (eliminating the menu and other things);
- Remove audio/subtitles in unwanted languages;
- Maintain the Blu-ray structure and not convert the original video;
Part 1. Copy main movie from Blu-ray Disc
Download trial version of Pavtube Blu-Ray Ripper , aka called Pavtube BDMagic, and install the application. Connect a BD drive with you PC and insert the Blu-ray Disc you want to rip. Keep your computer networked to ensure Pavtube Blu-ray Ripper copy videos properly.

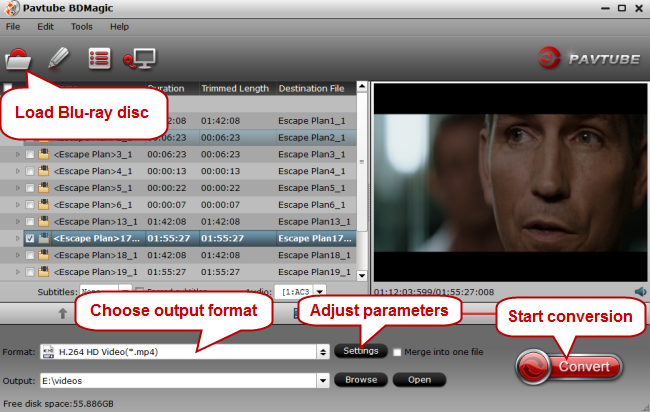
1. Double-click the icon to run Pavtube Blu-ray Ripper. Click on the “BD/DVD” button to import Blu-ray movie from the disc.
2. Now all the M2TS files in file list are checked. When you load Blu-ray movies, only the main title is checked automatically and this is what you need. The main movie is the .m2ts of longest duration. Check it and leave other .m2ts streams unchecked.
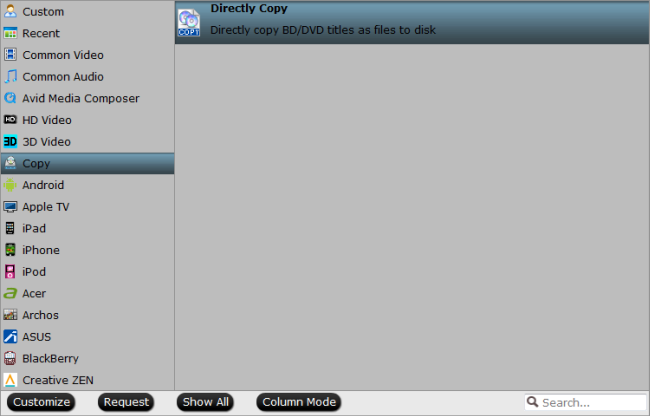
3. Click on the “Format” boarder and choose “Copy>> Directly Copy” as output option so as to copy main movie from Blu-ray Disc without changing it anyway.

4. Click “Convert” button to start copying Blu-ray main movie.
Tip 1: If you choose “Full Disc Copy” in step 2, the Blu-ray Ripper will copy all contents from Blu-ray Disc, including extras, movie trailers, menus, etc. In this way you get a whole copy of Blu-ray disc with bigger file size.
Tip 2: In case that the main movie is composed of multiple .m2ts streams, rip the Blu-ray movie to lossless MKV with ByteCopy instead. tsMueR support MKV as well.
Part 2. Remove unwanted tracks and create BDMV structure from main movie (*.m2ts)
Download freeware tsMuxer (Windows).

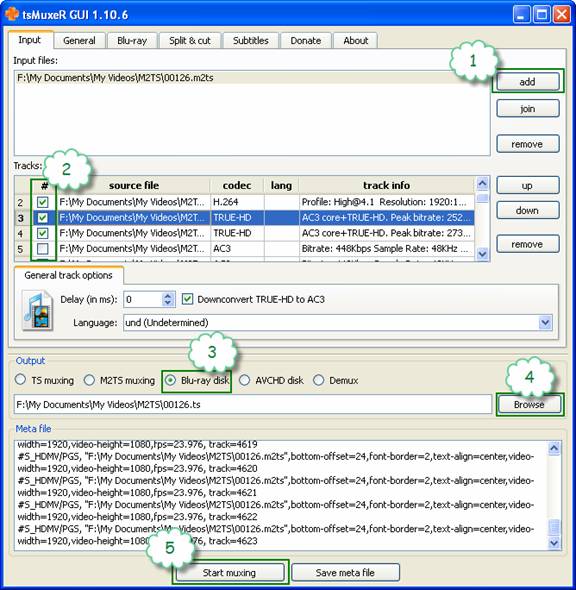
1. Click “Add” to load hacked Blu-ray main movie (*.m2ts) to tsMxer.
2. A Blu-ray .m2ts video usually contains multiple audio and subtitles streams in various languages. You can uncheck an audio/subtitles track to remove it. Removing unwanted audio/subtitles also helps you downsize the Blu-ray backup without compression.
3. Select “Blu-ray disk” mode.
4. Click “Browse” to specify an output folder to save the BDMV and CERTIFICATE Blu-ray file structure (make sure there is enough free space to save generated files).
5. Click “Start demuxing” to demux .m2ts and create Blu-ray file structure, i.e. BDMV and CERTIFICATE directory.
Tip 3: If you’d like to get Dolby Digital 5.1/DTS 5.1 audio instead of original TrueHD and DTS-MA audio, select the HD audio track and check “Down convert TrueHD to AC3”/“Down convert DTS-HD to DTS” in step 2.
From here you can play the Blu-ray movie in BDMV or import the BDMV and CERTIFICATE directory to ImgBurn (freeware) to burn a Blu-ray Disc or BD ISO image. Also, you can import the BDMV file structure to Pavtube Blu-ray Ripper, extract the main movie with just one selected audio language or subtitles, and compress the movie for iPad, iPhone, iPod, etc.
Media Players that support BDMV navigation:
Software players- VLC Media Player (freeware), XBMC (freeware), PowerDVD 10, etc
Hardware players- Popcorn Hour A200/A210, Popcorn Hour A-500 Pro/A-500/A-400, Netgear NeoTV 550 HD, etc
Useful Tips
- How to copy DVD and Blu-ray movie to your hard drive without quality loss?
- Make full copy of blu-ray disc in fastest and easiest way
- How to rip Blu-ray to MKV with DTS 5.1 for all audio streams?
- How to backup DVD and Blu-ray collections to home server?
- Make a backup of a Blu ray disc to hard disk without compression
- Back up commercial Blu-ray Discs

 Home
Home Free Trial BDMagic


