If you have a bunch of DVD movies and want to edit them with VideoPad, what should you do? As we know, the DVD format is incompatible with VideoPad, so you cannot import DVD to VideoPad and edit it directly. For those who have problems to import DVD clips to VideoPad for editing, you're in the right place. The rest of this article will tell how to do and please follow me.
Basic Knowledge About VideoPad
VideoPad by NCH Software is a basic video editing program that has many of the tools and features. It has the familiar timeline/storyboard workflow, which means you can view your project linearly or by each individual object regardless of how long it runs. You can switch back and forth between these two views with all your edits intact, which is great for beginner or novice users because it allows them to construct the basic building blocks in storyboard mode and do their fine-tuning in the timeline.
This video maker software allows you to add unlimited editing tracks to your project, giving you the versatility you need to create complicated projects. It also gives you tools like Chroma key (green screen), a video stabilizer and closed captions for the hearing impaired. These features allow you to create professional-level videos without investing in expensive professional software.
VideoPad Supported Video & Audio Formats
Import Formats:
Video: avi, mpeg, wmv, divX, Xvid, mp4, mov, vob, ogm, H.264, RM
Audio: wav, mp3, m4a, mid, flac, aac, wma, au, aiff, ogg, raw, dvf, vox
Export Formats:
Video: avi, wmv, mpg, 3gp, mp4, mov, YouTube, iPod, PSP, Mobile Phone
How to Import DVD to VideoPad for Further Editing?
As you can see above, not all popular video and audio formats are supported by VideoPad. In such case, if you want to import DVD to VideoPad, you have to convert DVD to VideoPad supported Video Format such as AVI, MPEG, WMV, etc. The good news is that there are many free DVD Ripper software such as Handbrake, MakeMKV that can help you to complete the job by rippering DVD into VideoPad compatible video formats.
But for commercial DVD movies, you will need a special program to bypass the DVD copy protection and convert DVD into VideoPad at the same time. Here, a program with combo function called Pavtube DVDAid for Windows/ Macis recommended to you, the program can automatically bypass all the DVD copy protection including DVD CSS, RCE, Sony Arccos, UOPs, Disney X-project DRM, etc in the background without installing any third-party program. You can then easily rip DVD into VideoPad editing formats listed above.
Edit DVD video
Besides ripping DVD for VideoPad editing, the program can also act as a simple VideoPad alternative to do some video editing work for you. You can trim or cut video to remove unwanted parts or segments, merge separate video into one, split large files into small parts, crop the black bars around the video frame, add video/image/transparent text watermark to video, apply special rendering effects to video, remove/replace audio in video, add external srt/ass/ssa subtitles to DVD, etc.
Now follow these steps to learn how to convert DVD to VideoPad compatible video format, so that you can edit DVD in VideoPad without any problem.
Step-by-Step to Convert DVD Movie Clips to VideoPad for Editing
Step 1: Add DVD into the program.
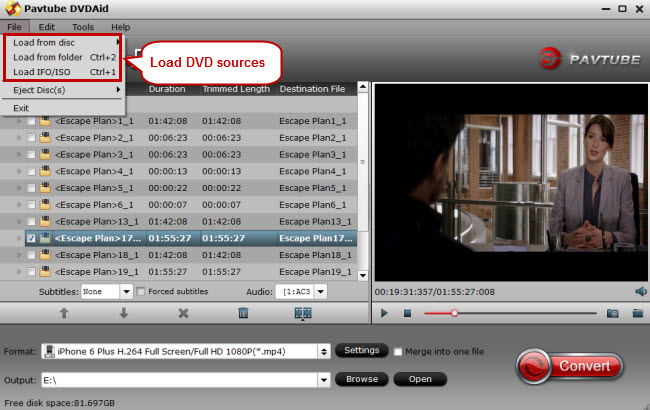
Insert your DVD disc into the optical drive on your computer, launch the converter, click "File" > "Load from disc" to load DVD disc movie into the program.
Here DVD Folder, DVD IFO File and DVD ISO Image File are supported as well.
Step 2: Choose output format for VideoPad
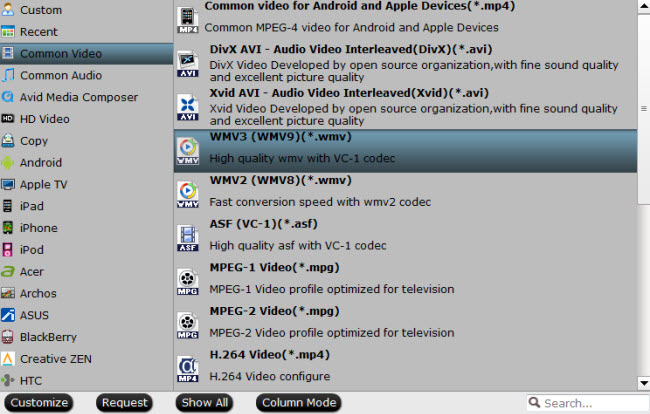
Click the pull down menu of "Format", select "DivX AVI- Audio Video Interleaved (Divx)(*.avi)" as the output format from "Common Video" category. For fast conversion speed, "WMV2(WMV8)(*.wmv)" would be the best output option. If you prefer high definition video, you can also choose "AVI HD Video(*.avi)" from the "HD Video" list.
Tip: Check a DVD title on the main interface to active the "Video Editor" function, then click the pencil like icon on the top tool bar to open the "Video Editor" window, you can trim video length, crop video black bars, add watermark, apply sepcial rendering effect, remove/replace audio in video, etc.
Step 3: Start DVD to VideoPad conversion process
After all the settings, hit right-bottom "Convert" button to start to rip commercial DVD to VideoPad editable file formats.
When the conversion is completed, hit the "Open Output Folder" on the main interface to pop out the folder with the converted files. Then feel free to load video into VideoPad without any problem.

 Home
Home


 Free Trial DVDAid


