Sony Vegas Pro is a video editing suite aimed at professionals needing to produce high quality HD videos. You can import many kinds of video files into Sony Vegas Pro to edit. But when your source video is on Blu-ray disc, it will depends if you can import Blu-ray to Sony Vegas Pro to edit.
Blu-ray video is M2TS format and normally, Sony Vegas Pro handles M2TS files fine. When the Blu-ray is your own work (and not copy protected) you can copy the file d:\BDMV\STREAM\00000.m2ts from the optical drive on to a hard drive. Open in Vegas Pro from the hard drive and edit away. But when your Blu-ray is commercial one with copy protection or your Blu-ray has multiple audio tracks and subtitle tracks, you can't import Blu-ray to Sony Vegas Pro successfully.
In addition, a M2TS will also not import with a DTS or DTSHD audio track. You will have to convert any DTS to Dolby Digital with video converters. What's more, Sony Vegas Pro handles M2T files fine but a lot of it depends on the power and quality of your machine. Sony recommends at least a 2.8Ghz Core 2 Duo for HD but at least a Core i7 Quad Core is recommended with at least 6GB of memory for the best experience. So the best option to edit Blu-ray with Sony Vegas will be to rip and convert Blu-ray to Sony Vegas Pro compatible video formats.
Tool You Need to Rip Blu-ray to Sony Vegas Pro
Pavtube BDMagic allows you to load Blu-ray content from discs or specific paths on your computer, then remove Blu-ray copy protection including AACS, BD+, Cinavia, UOP, DRM, BD-ROM Mark and High-bandwidth Digital Content Protection. It converts Blu-ray M2TS files into Sony Vegas Pro supported AVI, MOV, MP4, WMV, MPEG-1/2/4, H.264/AVC, H.265/HEVC,(Vegas Pro 14 supports HEVC) video files. If there are multiple audio tracks or subtitles available, you can choose which should be used for the output video files. You also can choose which audio codec to preserve such as ACS, DTS or DTSHD.
Furthermore, you can configure audio and video settings when it comes to the codec, frame rate, sample frequency rate, channel mode and others to output better compatible video with Sony Vegas. Additionally, you can edit the video clips with built-in video editor to trim, crop, merge, split, rotate, flip, volume, add subtitle/watermakr and more.
Steps to Convert Blu-ray to Sony Vegas Pro 14/13/12/11
Step 1. Load Blu-ray movies
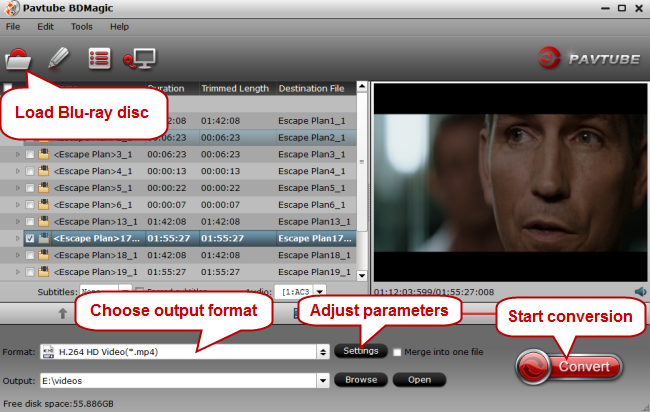
Launch the Blu-ray to Sony Vegas Pro converter. Insert the Blu-ray disc into your Blu-ray drive and load Blu-ray to the software by clicking "File" button. DVD is also supported to convert to Sony Vegas Pro. After loaded Blu-ray and DVD video, you can choose desired subtitle and audio track in "Subtitle" and "Audio" box at the bottom of the chapter list.

Step 2: Choose Vegas Pro supported format
Click "Format" option to choose the output format. To make your Sony Vegas Pro 14/13/12 to readthe output files, just choose the most Sony Vegas accepted "WMV (VC-1) (*.wmv)" or MPEG-2 under "Adobe Premiere/Sony Vegas" option as output format. You also choose HD MP4 format to keep high video quality and get the compatibility.

Click “Settings” button if you’d like to customize advanced audio and video parameters like Video Codec, aspect ratio, bit rate, frame rate, Audio codec, sample rate, audio channels. Make sure the output audio codec is AC3.
Step 3: Start to convert Blu-ray to Vegas Pro
Back to the main interface. Hit the convert button, it will start converting Blu-ray for importing to Sony Vegas Pro immediately. Soon after the conversion, just click “Open” button to get the generated files for natively editing in Sony Vegas Pro 10/11/12/13 perfectly.
How to Burn Blu-ray using Sony Vegas Pro?
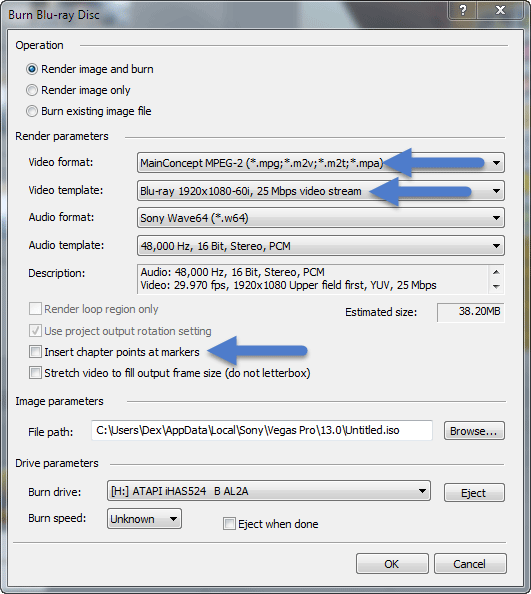
You not only can import Blu-ray to Sony Vegas Pro for editing, but also can burn Blu-ray using Sony Vegas Pro. Once your project is complete and ready to turn into a Blu-ray disc, remember to do one final Save As. Then go to Tools in the top menu - Burn Disc - Blu-ray Disc. Burn Blu-ray Disc window will open up.
Keep the first Operation setting on option one.
Blu-ray supports two different Video Formats. So you can choose MainConcept MPEG-2 or Sony AVC/MVC. The choice is yours. Mainconcept does support a higher Bit Rate, so that is what I normally use.
Next you need to select a Video Template. Vegas Pro should automatically set the best option for you. The main thing to check is the frame rate setting. So use the same information I shared when talking about frame rates for DVD.
The Audio settings only have two options. You can use Dolby Digital Pro or Sony Wave 64.
If you added Scene Selection/Marker Points to your project, make sure to select "Insert Chapter Points at Markers".
Remember to check the Estimated Size value. There are two types of Writable Blu-ray Discs you can use. 25GB Single Layer and 50GB Dual Layer.
If everything looks good, place a writable Blu-ray Disc into your computer and press OK. Vegas Pro will automatically render the Video and Audio and then burn the disc for you. You can see the detailed steps and learn how to burn DVD using Sony Vegas from here.


 Home
Home Free Trial BDMagic


