Since its release in October 2016, the Sony PlayStation VR has brought gamers with abundant and powerful gaming capabilities. However, the PlayStation VR, is more than just a top gaming peripheral. What some of you may not know is that there's a feature that allows users to watch 3D films on the headsets via USB. So you can get some 3D videos to watch not just play games with PS VR. Well, if you've collected a pile of DVD discs, the most favorable way is to rip DVD to 3D videos for PS VR headsets for playing with 3D effect. The following article will show you how to create stereoscopic 3D from DVD disc for Playstation VR enjoying.
Before you get started to play DVD on PS VR
Actually, it's quite easy and can be done well with the help of a professional yet easy-to-use DVD to PS VR supported 3D video conversion tool. Here Pavtube DVDAid(Read Review) can be the bee's knees, which can help you easily convert DVD to 3D videos at 30X faster speed compared to other trending programs with NVIDIA CUDA and AMD APP technology support. In addition, this program can also convert DVD to nearly all types of video formats including MOV, AVI, WMV, MPG, FLV, MKV, 3GP, etc as well as rip DVD to optimized video for playback on Gear VR, Google Cardboard, DayDream View, HTC Vive, etc. or iPad, iPhone, iPod, Apple TV, Samsung Galaxy, Blackberry, Xbox One and more.
If you're using a Mac, please turn to Pavtube DVDAid for Mac, which allows you to convert DVD to PS VR on Mac. Take a look at its amazing features and download it on your Windows PC or Mac right now!
Let’s Start to Convert DVD to 3D for PS VR
Note: This guide takes the Windows version screenshots for example. The way to rip DVD to PS VR on Mac OS is the same. Just make sure you get the right version.
Step 1: Load DVD disc
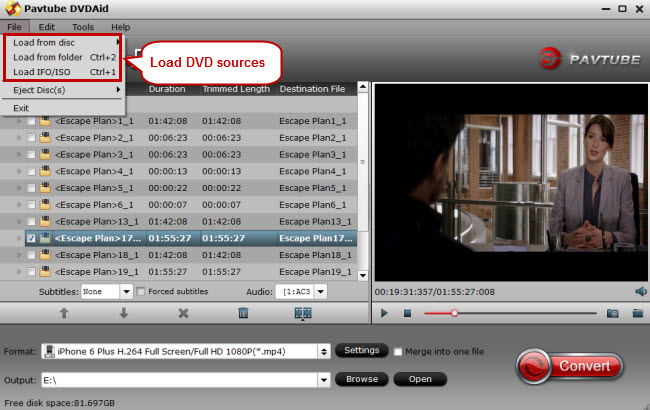
Add DVD from disc drive into this program by clicking "File">"Load from Disc" button. Or you can choose to import DVD Folder, DVD IFO File,DVD ISO Image File from hard drive.
Tips: The program will automatically select the main DVD title for you, you can select your desired subtitle languages or audio tracks from the drop-down list of "Subtitle" and "Audio" under the DVD title displaying list. You are luck to keep forced subtitles with this tool released from Pavtube Studio.
Step 2: Output PS VR accepted 3D Stereoscopic format
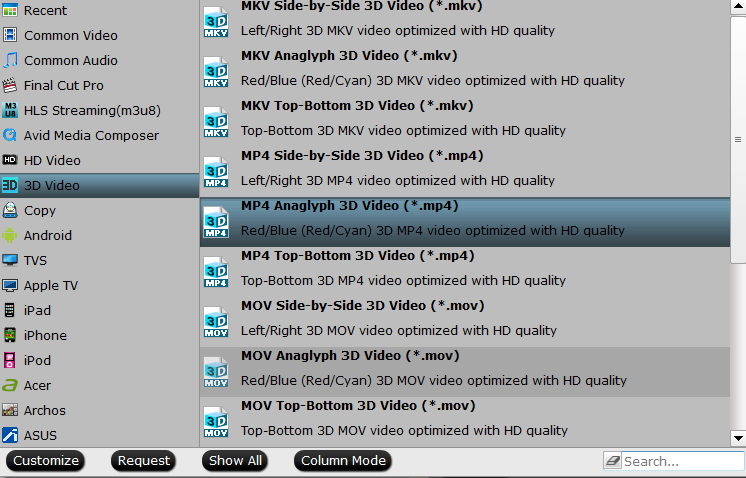
From "Format" drop-down list, select PS VR compatible 3D format from "3D Video" > "MP4 Anaglyph 3D Video(*.mp4)", You can also choose Anaglyph 3D MKV or Anaglyph 3D AVI format according to your own needs.
With its help, you can effortlessly transcode not only DVD, but also Blu-ray to PS VR's playable 3D format at fast speed while retaining its original quality.
Step 3: Adjust 3D profile settings
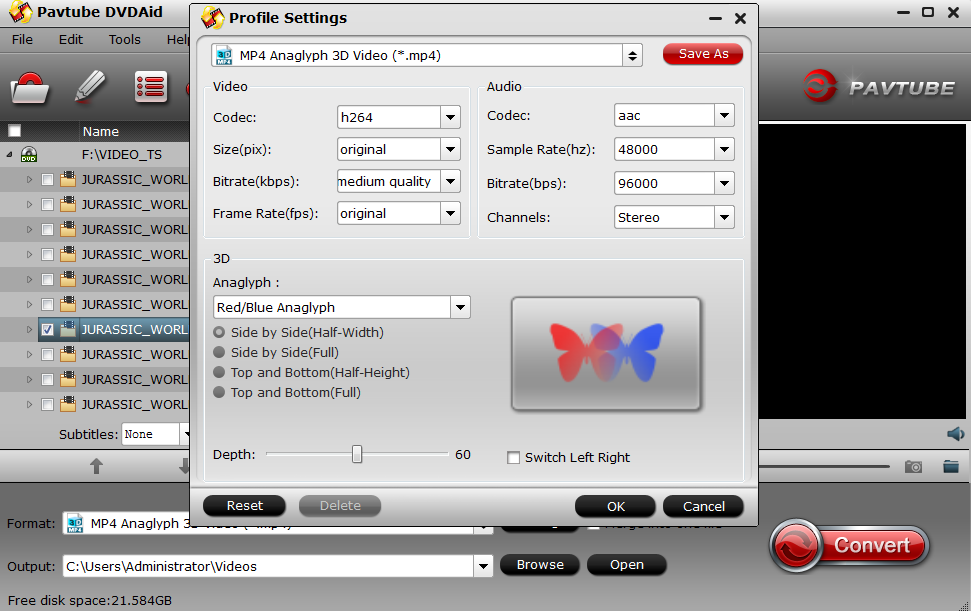
Click "Settings" to open "Profile Settings" window, adjust the output video codec as H.264, audio codec as AAC, MP3 or AC3 to make them compatible with PS VR. You can also do some 3D profile settings such as changing the 3D video depth or make a choice between "Red/Blue Anaglyph" or "Red/Green Anaglyph".
Step 4: Start DVD to PS VR conversion
Go back to the main interface, click the big red "Convert" button to start the DVD to PS VR supported 3D Anaglygh MP4/MKV/AVI conversion process.
When the conversion process is completed, click "open output folder" to pop out the folder with the ripped DVD movie files. Then transfer the 3D content to USB stick and inset it to PS4 USB port. Switch PS VR to movie mode to enjoy the 3D movies at home.

 Home
Home


 Free Trial DVDAid


