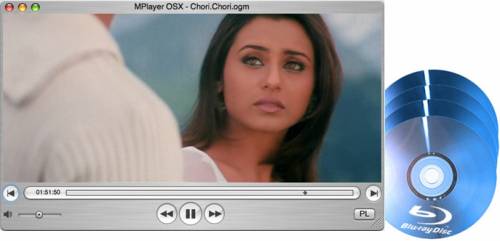
At present, the playback of HD video is a piece of cake for the mainstream PCs, but for Apple’s Mac computer, it has been a chronic pain to play high-definition video files. Apple is the leader in the field of high-definition movie, but because of their own MOV HD format protection strategy, both HD Blu-ray and REMUX files have always been difficult to get the perfect support on Apple’s Mac platform. To realize the goal of watching Blu-ray movies on Mac with the most popular MPlayer, this article elaborates a workaround on how to copy Blu-ray disc to play with MPlayer on Mac OS.
What you will need:
- First you will need an external Blu-ray drive for your Mac to read the Blu-ray disc.
- Then you will need software to crack the encryption and convert the Blu-ray data to MPlayer compatible file formats. The software we recommend is Pavtube Blu-Ray Ripper for Mac. The main reason we choose it is because it is capable of removing copy-protections and doing format conversion at the same time. Best of all, it adopts advanced video and audio in sync technology, which will never let users encounter audio and video out of sync issues.
Step-by-step guide: How to rip Blu-ray for playback with MPlayer on Mac
Before we start, you may wanna know the details of MPlayer supported video and audio formats:
- Container formats: 3GP, AVI, ASF, FLV, Matroska, MOV (QuickTime), MP4, NUT, Ogg, OGM, RealMedia, Bink
- Video formats: Cinepak, DV, H.263, H.264/MPEG-4 AVC, HuffYUV, Indeo, MJPEG, MPEG-1, MPEG-2, MPEG-4 Part 2, RealVideo, Sorenson, Theora, WMV, Bink
- Audio formats: AAC, AC3, ALAC, AMR, DTS, FLAC, Intel Music Coder, Monkey’s Audio, MP3, Musepack, RealAudio, Shorten, Speex, Vorbis, WMA, Bink
OK, here we go.
Step 1: Free download Blu ray converter for Mac, install and run it
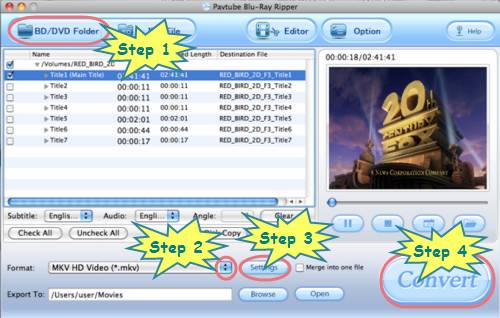
Once you launch this Mac Blu ray converter, click “BD/DVD Folder” to load your Blu-ray movie files.

Step 2: Choose output format for MPlayer
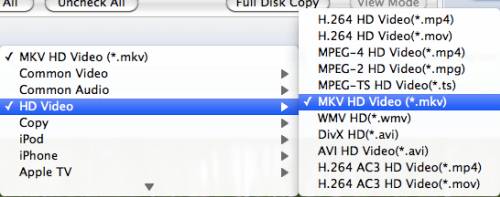
Click the pull down menu at the opposite side of “Format”, then all the output format presets will show up. To output SD video, you can select “Common Video”; to export HD video, you can choose “HD Video”. We select “HD Video”> “MKV HD Video (*.mkv)” for instance.

Step 3: Adjust audio and video parameters
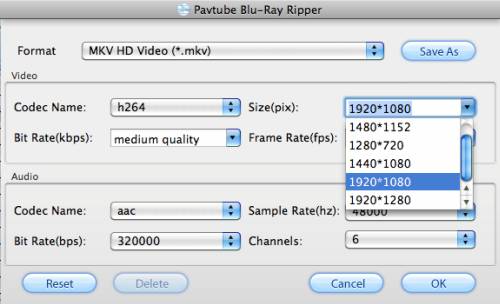
Click “Settings” button of this Mac Blu ray converter to do your own adjustments. Once clicked this button, the following window will pop up, on which you are allowed to adjust video and audio settings like codec name, aspect ratio, bit rate, frame rate, sample rate, and audio channels. If your Mac is quite fast, then you can adjust the options to bigger ones, otherwise, you need consider if your Mac is able to run the final HD files. For example, for a faster Mac, you can set the aspect ratio at 1980*1080, but for a slower Mac, you need set the size down to 1280*720, this would give you a DVD quality playback experience as well.

Step 4: Start ripping Blu-ray for MPlayer on Mac
Click the big button “Convert”, the Blu-ray ripping task will process immediately. When finished, you can get the ripped Blu-ray contents via clicking “Open” button with ease. Now, just open the files in MPlayer for watching. Hope this helps.
If you are using Windows, you can see How to back up Blu-ray disc to play in MPlayer.
Useful Tips
- How to play ripped Blu-ray movies in VLC Media Player by chapters
- Use XBMC for Blu-ray Playback on Mac
- Play ripped Blu-ray MKV files in MPlayer with audio and subtitles track
- How to play Blu-ray movies in VLC on Mac with selected audios/subs?
- Get Windows Media Center playing MKV movie ripped from Blu-ray Disc
- Enable Windows Media Player play MKV videos

 Home
Home Free Trial BDMagic for Mac


