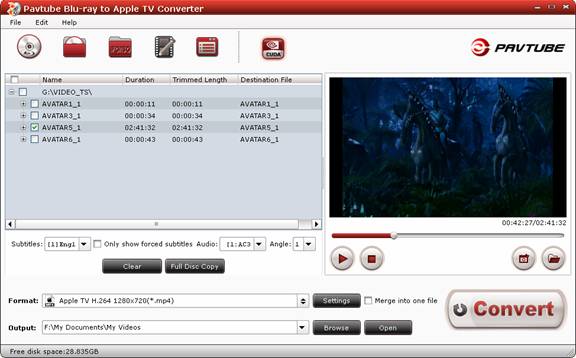
The main interface is composed of title bar, menu bar, toolbar, file list, media player, output settings area, and status bar.

1. Menu bar
There are three menus in menu bar, namely “File”, “Edit” and “Help”.
File: Contain operations like add file.
Edit: Edit selected task.
Help: Seek help and update information.
2. Toolbar
Three icons are displayed in the toolbar. ![]()
Load Disc : Load Blu-ray disc or DVD from optical drive. When both Blu-ray and DVD exists, the software will load DVD.
Load Folder : Load Blu-ray or DVD movie from BDMV or VIDEO_TS folder.
Load IFO/ISO : Load IFO or ISO image file.
Edit: Edit selected file (Select a file first when you find the icon grayed out).
Option: Open Option panel.
CUDA: Turn on/ off CUDA. (En-decoding speed will be greatly accelerated when CUDA is turned on. Note that CUDA is accessible only when there is an Nvidia graphic card that supports GPU en-decoding acceleration. The CUDA button will be grayed out/ disabled when the software fails to detect a satisfactory Nvidia graphic card. And The CUDA works only when creating H.264 encoded video files. Click to learn more information about CUDA on Pavtube)
3. File list and Control button
In the file list/ task list you can find task information like file name, duration, trimmed length, and destination. Under the file list there are control buttons to organize the conversion tasks.

Name: the name for each title or chapter.
Duration: the original length of each file before conversion.
Trimmed Length: the length of each file after trimming.
Destination File: the name of the converted file.
Subtitles: Click to set subtitle of desired language.
Only show forced subtitles: Check to hide subtitles and show subtitle only when alien/ foreign language is spoken (grays out when "None" is selected in Subtitle box). Learn more about Forced Subtitle.
Audio: Click to set audio track of desired language.
Angle: Click to set a different angle (if there are more than one angle).
Clear: Clear the file list.
Full Disc Copy: Back up the entire disc to hard drive.
4. Media Player/Preview Window
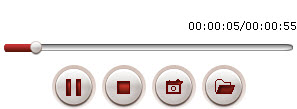
The Media Player enables users to preview the video before conversion. Double-click on a file to preview it, or you can use the control buttons as well.

Play: Play or pause the video.
Stop: Quit previewing of the current playing file.
Snapshoot: Thumbnail present frame and save to specified place. (Tip: You can set file format and location for the thumbnails in the section of Configuration Option)
Open: Open the folder that thumbnails are saved to.
5. Output settings area
It is easy to set output destination, format and its advanced parameters for conversion.

Format: Specify an output video/audio format.
Settings: Set advanced video and audio parameters.
Output: Show the output path.
Browse: Set output location.
Open: Open output folder that contains generated files.
Merge into one file: Combine and output all selected files as one file after conversion.
6. Status bar
The Status bar show you free space of your target disk and the storage occupation of current tasks.
7. The Convert button: Click to start conversion.

 Home
Home


