Pavtube ByteCopy for Mac makes playing retail Blu-ray movies on Mac OS X possible

As we all know, no Mac computer has shipped with an internal Blu-ray drive, and watching a Blu-ray movie on a Mac using an external player hasn’t even been supported by OS X. However, with the release of Pavtube ByteCopy for Mac, watching a retail Blu-ray movie on a Mac is finally possible. Although it’s just a workaround that would allow you to watch commercial Blu-ray movie on a Mac, the easy-to-use and intuitive interface of the Blu-ray backing up tool will make everything easier without bringing you any trouble.

What can Pavtube ByteCopy for Mac do for you?
- Reading Blu-ray discs protected with BD+ and AACS encryptions up to MKB v25.
- Backing up/copying commercial Blu-ray movies and standard DVD movies to Mac Hard Drive in MKV container format with lossless quality.
- Allowing full preservation of all subtitles streams, chapter markers, and audio tracks, including Dolby Digital TrueHD Audio, DTS-HD Master Audio, etc.
- Preserving video in 1080p quality at 16:9 aspect ratio as the original BD movie without transcoding.
- Removing unwanted audio and subtitles tracks at will.
- Fantastic control of all audio tracks, subtitles streams (on/off), and chapters during playback.
- Converting/compressing 1080p Blu-ray to 720p, 576p, and 480p video to fit different end use with your specified video codec, such as h264, xvid, and mpeg2video.
- Down converting a Dolby Digital TrueHD Audio/DTS-HD Master Audio into a DTS/AAC/AC3 audio, etc.
As an example, we will see how to play the Blu-ray Backup created by Pavtube ByteCopy in VLC player with selected audio and subs track on a Mac. (Download the freeware VLC Media Player)
First off, backup/copy your Blu-ray movie to your Mac Hard Drive with Pavtube ByteCopy for Mac. In this step, you need an external Blu-ray drive — Apple never provides this on any Mac, no matter MBP, MBA, iMac or Mac Pro. Go get one on Amazon, Best Buy, eBay or etc. Or you can choose to use an external BD drive compatible with Mac recommended by Pavtube. Then please check the guide Lossless Blu-ray to MKV backup on Mac: keep all audio/subtitles tracks and chapters to see the detailed processing steps.
The MKV files generated by Pavtube ByteCopy for Mac are compatible with Mac VLC media player. The following steps show you how to select wanted audio track and subtitles track during watching Blu-ray MKV backups with VLC on Mac.
1: Run VLC player, and add the MKV file created by Pavtube ByteCopy for Mac into VLC for playback.
2: Select audio track. When the MKV file is starting playing, just follow “Audio” > “Audio Track” to select your wanted audio track to display. See details in the following screenshot:

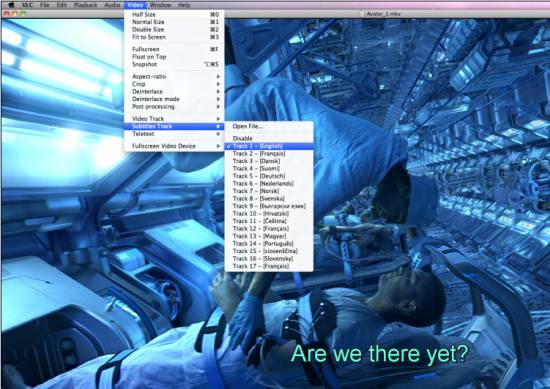
3: Select subtitles track. Follow “Video” > “Subtitles Track” to choose your needed subs as appearing subs during playback:

Now you are able toplay retail Blu-ray movies on Mac OS X via VLC player successfully. Also if you prefer using Quicktime, install pluggin perian — free as well.
More than making MKV for playback with media player software on a Mac (like VLC media player, Quicktime, XBMC), the Blu-ray backups packaged in the MKV container produced by Pavtube ByteCopy for Mac also compatible with lots of popular HD Media Player devices, such as WD TV HD Media Player, Popcorn Hour C-200, Popcorn Hour A-210, Lacie HD Classic Player, Seagate Theatre Plus, Netgear Neo TV 550, etc. As long as your HD player supports selecting audio track, subs track, and chapter, you are able to make good control of them during playback. Enjoy!
 |
 |
 |

